
Outlined steps for customizing the contact default view in HubSpot. Customizing the default view helps teams access the most relevant contact information efficiently, improving productivity and data management.
Context
The contact default view is what users see when they open a contact record. Customizing this view with relevant cards and properties ensures that key data is easily accessible for quick reference and streamlined workflows.
Terminologies
- Default View: The standard layout and properties displayed when viewing a contact record.
- Card: A section in the contact record view that holds grouped properties for easy visibility.
Tools
Add any relevant tools associated with this process.
- Hubspot - Used for creating and managing properties.
Roles & responsibilities
Define who will be executing the activities related to the SOP.
- Team Member: Responsible for updating the contact default view.
- Approver: Reviews and approves the default view layout.
Procedure
Step 1:
Navigate to Settings in HubSpot.

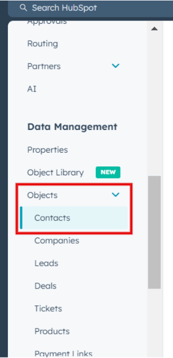
Step 2:
Select Objects from the settings menu and choose Contacts.
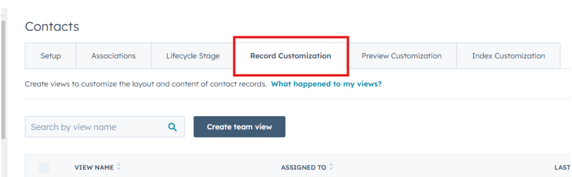
Step 3:
Click on Record Customization under the Contacts settings.
Step 4:
Select Default View to begin customizing the layout.

Step 5:
On the left-hand side, click Add Card to create a new card for displaying properties.

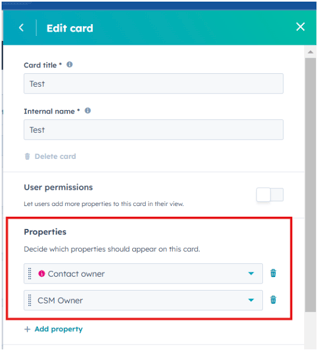
Step 6:
Click Create Card and enter a Card Title and Internal Name for organizational purposes.


Step 7:
Add the necessary Properties to the card by selecting them from the property list.
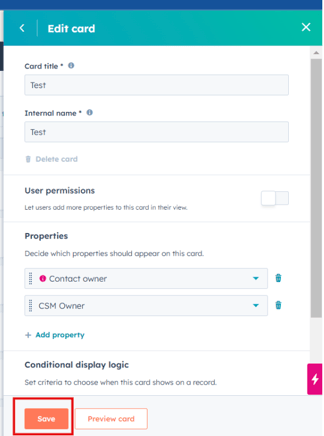
Step 8:
Click Save to finalize the new card and ensure it appears in the default contact view.
Notes
- You can drag and drop cards to rearrange their order within the default view.
- Regularly review and update contact views to reflect any changes in data needs or workflow requirements.